Introduction
Kubernetes is the de facto standard for container orchestration, but running it on a full-scale setup can be overkill, especially for home labs or edge computing. That’s where K3s, a lightweight Kubernetes distribution from Rancher, comes into play.
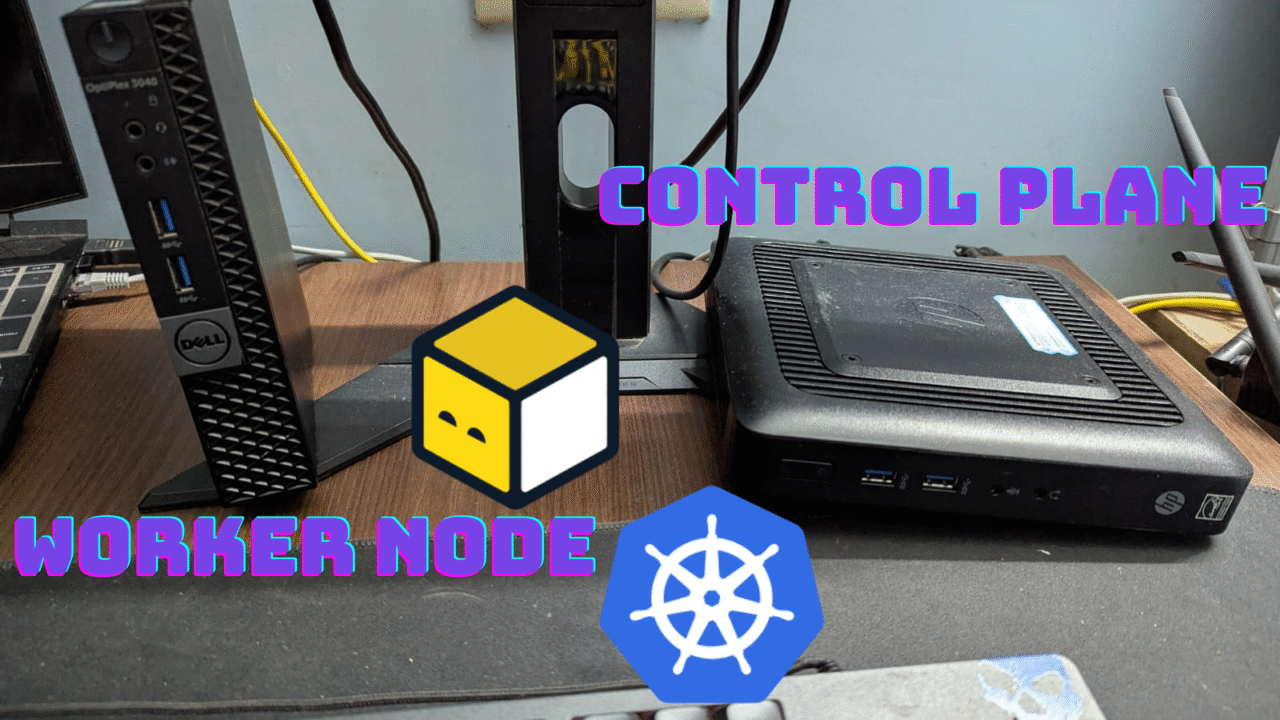
In this post, I’ll walk you through setting up a basic K3s cluster on 2 mini PCs—one as a server (control plane) and the other as a node (agent). This setup is ideal for experimenting with containerized workloads without the complexity of full-blown Kubernetes.
Compared to kubeadm-based Kubernetes setups, K3s:
- Requires less memory and CPU
- Comes bundled with essential components (like
containerd,flannel,traefik) - Has simplified HA options and minimal dependencies
Prerequisites
Hardware
- 2 x Mini (I’m using 2 mini PCs with a 2-core CPU for the master node and a 4-core CPUs for the worker node)
- Minimum: 2 CPU cores, 2GB RAM (4 GB+ recommended), and at least 16GB storage per device
Network
- Both devices must be on the same local network (Wi-Fi or Ethernet)
- Static IPs or DHCP reservation for consistency (optional but recommended)
OS
- Ubuntu Server 22.04 LTS (or any Linux distro supported by K3s)
- Root or sudo access
Step 1: Prepare the Nodes
Update your system and install essential packages
sudo apt update && sudo apt upgrade -y
sudo apt install curl wget vim -yAssign Static IPs
Ensure each device has a consistent IP. You can either configure this in your router (DHCP reservation) or manually:
Router DHCP reservation video: https://youtu.be/c9e2zisXnWQ?si=V4ucuAI8jXrxv4Rv
Step 2: Set Up Hostnames and Hosts File
A hostname is a label that identifies a device on a network. Think of it like a name for a computer. It makes it easier to refer to and locate devices within a network rather than having to remember their IP addresses (e.g., “my-server” instead of “192.168.1.100”).
On the master node, run the following command:
sudo hostnamectl set-hostname k3s-masterOn the worker node, run the following command:
sudo hostnamectl set-hostname k3s-worker1Add host entries to `/etc/hosts` on both nodes (replace IPs with your actual IPs):
echo "192.168.1.130 k3s-master" | sudo tee -a /etc/hosts
echo "192.168.1.125 k3s-worker" | sudo tee -a /etc/hosts
Add the master IP to the hosts file on the worker node.
echo "<MASTER_IP> k3s-master" | sudo tee -a /Step 2: Firewall Configuration with UFW (Optional but Recommended)
Even though you’re running your Kubernetes cluster at home, it’s still a good idea to harden your network by limiting which ports are open. The Uncomplicated Firewall (UFW) is a simple tool that helps you do just that.
Let’s configure basic firewall rules to allow only the traffic your K3s cluster needs to function properly.
Set Default Firewall Rules
Run these commands on both nodes (master as well as worker):
sudo ufw default allow outgoing
sudo ufw default deny incoming
sudo ufw enable
allow outgoing: Let’s have your system initiate connections (like pulling images or installing packages).deny incoming: Blocks all incoming traffic unless explicitly allowed (a crucial baseline security step).
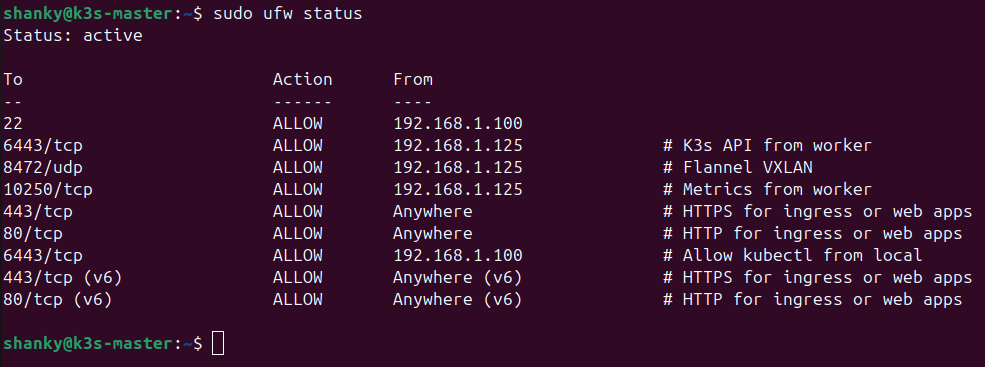
On the K3s Server Node (Master)
This is your control plane (node-1 In our example). It receives connections from agent nodes and is responsible for managing the entire cluster.
Run these commands on the Master node:
# Allow incoming Kubernetes API from worker only

sudo ufw allow in proto tcp from 192.168.1.125 to any port 6443 comment 'K3s API from worker.'

# Allow Flannel overlay network (VXLAN)

sudo ufw allow in proto udp from 192.168.1.125 to any port 8472 comment 'Flannel VXLAN'

# Allow metrics server from worker

sudo ufw allow in proto tcp from 192.168.1.125 to any port 10250 comment 'Metrics from worker'
sudo ufw allow 80/tcp comment 'HTTP for ingress or web apps'
sudo ufw allow 443/tcp comment 'HTTPS for ingress or web apps'

# Allow incoming Kubernetes API from worker only
sudo ufw allow in proto tcp from 192.168.1.125 to any port 6443 comment 'K3s API from worker.'Note: I have used 192.168.1.125 as the local IP address assigned to the worker node.
sudo ufw allow from 192.168.1.100 to any port 6443 proto tcp comment 'Allow kubectl from local'Also, note that 192.168.1.100 is the local IP address of the machine I will use to perform tasks on these nodes.
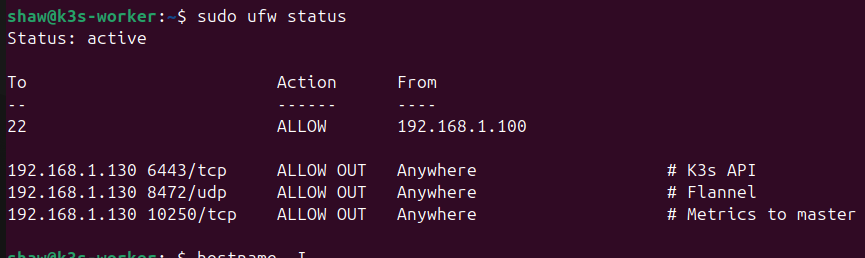
On the K3s Agent Node (Worker)
The agent (node-2) doesn’t need to accept as much traffic. It only needs to allow connections from the control plane and enable networking for the pods running on it.
Run these on the agent node:
# Allow outgoing K3s API to master
sudo ufw allow out proto tcp to 192.168.1.130 port 6443 comment 'K3s API to master'

# Allow outgoing Flannel to master
sudo ufw allow out proto udp to 192.168.1.130 port 8472 comment 'Flannel to master'

# Allow outgoing metrics to master
sudo ufw allow out proto tcp to 192.168.1.130 port 10250 comment 'Metrics to master'
Note: I have used 192.168.1.130 as the local IP for my master node machine.
Step 3: Install K3s on the Server Node
SSH into your first machine (k3s-server) and run:
curl -sfL https://get.k3s.io | sh -s - --write-kubeconfig-mode 644This will:
– Install K3s as a server (master node)
– Start the K3s service
– Create a kubeconfig file at `/etc/rancher/k3s/k3s.yaml`
Get the Node Token
On the master node, get the node token, which will be used to join the worker:
sudo cat /var/lib/rancher/k3s/server/node-tokenCopy this token—you’ll need it for the next step.
Step 4: Install K3s on the Agent Node
SSH into your second machine (k3s-worker-node) and run:
Join the worker node. On the worker node (k3s-worker), run:
curl -sfL https://get.k3s.io | K3S_URL=https://k3s-master:6443 K3S_TOKEN=YOUR_NODE_TOKEN sh -Replace `YOUR_NODE_TOKEN` with the token you copied from the master node.
Step 5: Verify the Cluster
On the master node, check the nodes:
sudo kubectl get nodes
You should see both nodes listed after a minute or two, with the master showing as “control-plane” and the worker as “<none>” in the ROLES column.
Step 6: (Optional) Configure kubectl on Your Local Machine
If you want to control the cluster from your local machine:
1. Copy `/etc/rancher/k3s/k3s.yaml` from the master node to `~/.kube/config` on your local machine
scp -i id_rsa_depo2 shanky@192.168.1.130:/etc/rancher/k3s/k3s.yaml ~/.kube/config2. Replace `127.0.0.1` or `localhost` in the config file with the master node’s IP address
nano ~/.kube/config
3. Labeling Worker Nodes for Role-Based Scheduling
By default, K3s doesn’t automatically label nodes with roles like worker or control-plane in the same way, full Kubernetes clusters do. However, adding these labels manually helps when you’re defining node affinity rules, taints/tolerations, or using Helm charts and operators that expect role-based labels.
kubectl label node k3s-worker node-role.kubernetes.io/worker=worker
Final Thoughts: Your Home Kubernetes Lab is Ready!
Congratulations! You’ve successfully set up a lightweight, production-ready Kubernetes cluster using K3s on your mini PCs. This powerful home lab setup gives you:
✅ A real Kubernetes environment to learn and experiment with
✅ Low power consumption, perfect for 24/7 operation
✅ The foundation to deploy containerized applications
✅ Hands-on experience with cluster management